The Ultimate Lawn Mower Blade Replacement Guide
By John Mike
Published on 2026-01-14 14:39:00
A pristine lawn requires sharp equipment. When your grass looks torn, frayed, or yellow after mowing, your equipment is crying out for maintenance. Performing a proper lawn mower blade replacement stands as one of the most crucial tasks for any homeowner. Dull equipment damages your yard and forces your engine to work twice as hard.
Many people feel intimidated by DIY mower repairs. They assume they need to hire a small engine mechanic or buy a completely new machine. However, swapping out this essential component takes only a few minutes when you have the right guidance.
This comprehensive guide will teach you exactly how to identify a dull cutting surface and complete a successful lawn mower blade replacement safely. You will learn expert techniques to restore your machine's performance using reliable OEM components.
Recognizing the Problem: When to Change Your Blade
Grass tells you exactly when your equipment needs attention. A sharp cutting edge slices through grass blades cleanly, leaving a flat, even top. A dull edge tears the grass. This tearing leaves ragged, split ends that quickly turn brown and invite lawn diseases.
Inspect your machine after every few cuts. You might notice heavy vibration coming from the deck while operating the machine. This usually indicates a bent or unbalanced component underneath. Hitting a hidden rock, tree stump, or thick branch easily causes this damage.
Continuing to operate damaged equipment creates severe engine strain. The engine must generate more torque to force a dull edge through thick grass. This unnecessary stress leads to premature engine failure and expensive repairs down the road.
The Solution: Choosing Exact OEM Components
The best way to fix poor cutting performance is a complete lawn mower blade replacement. Sharpening an old, battered component only goes so far. Eventually, the metal wears down, loses its temper, and becomes structurally weak.
When undertaking this repair, you must select the right replacement part. Authentic OEM replacement parts provide the only guarantee of safety and performance. Manufacturers engineer these specific components to match the exact aerodynamic requirements of your specific mower deck.
Using genuine parts ensures proper lift, efficient grass bagging, and perfect balance. You avoid the dangerous vibration issues that often accompany cheap aftermarket knockoffs.
Step-by-Step Lawn Mower Blade Replacement Guide
Safety comes first when working with power equipment. Follow these exact steps to complete your lawn mower blade replacement without injury or property damage.
Step 1: Gather Your Tools and Safety Gear
Before you start, collect a socket wrench, a block of wood, and heavy-duty work gloves. The gloves protect your hands from sharp metal edges. You also need your new OEM component ready for installation.
Step 2: Disconnect the Spark Plug
Never skip this step. Disconnect the spark plug wire and tuck it safely away from the spark plug housing. This completely prevents the engine from accidentally starting while your hands are under the deck.
Step 3: Tilt the Mower Correctly
You must tilt the machine to access the underside. Always tilt the mower so the carburetor and air filter face up. Tilting it the wrong way floods the engine with oil, creating a massive smoking problem when you start it later.
Step 4: Secure and Remove the Old Component
Wedge your block of wood between the metal edge and the mower deck. This prevents the shaft from spinning while you loosen the center bolt. Use your socket wrench to turn the mounting bolt counterclockwise. Remove the bolt, the mounting hardware, and the damaged metal piece.
Step 5: Install Your New OEM Part
Position your new replacement piece on the mounting shaft. Pay close attention to the stamping on the metal. Most manufacturers stamp the word "Bottom" or "Grass Side" on the face that should point toward the ground.
Step 6: Tighten and Reassemble
Hand-tighten the mounting bolt to ensure the threads align properly. Wedge your block of wood back into the deck on the opposite side. Use your socket wrench to tighten the bolt firmly. Reconnect your spark plug wire, and your lawn mower blade replacement is complete.
Product Benefits: Why We Trust Authentic Parts
When you perform a lawn mower blade replacement, the quality of your parts dictates the success of the repair. We strongly recommend sourcing your components from eReplacementParts.com for several distinct reasons.
Unmatched Inventory Selection
Finding the precise match for an older machine often feels impossible. Thankfully, you can access a 2+ million parts inventory through our platform. This massive database covers virtually every major brand and obscure model on the market.
Speed and Reliability
Grass grows fast in the spring. You cannot wait three weeks for a simple metal bracket to arrive from overseas. When you order from our preferred catalog, you benefit from fast shipping from the USA. Your equipment gets back to work before your yard turns into a jungle.
Guaranteed Satisfaction
Ordering mechanical parts online sometimes causes hesitation. You might worry about ordering the wrong specification. Our 365-day return policy eliminates this stress. If the component does not fit your machine perfectly, returning it requires minimal effort.
Explore Now
Expert Tips for Optimal Mowing Performance
Professional landscapers use a few insider secrets to keep their equipment running perfectly.
First, always check the balance of a new component before installation. Even factory-new items occasionally suffer from slight imbalances. You can hang the metal piece on a nail through its center hole. If one side dips heavily, it requires slight filing to achieve perfect balance.
Second, clean the underside of your mower deck while you have the machine tilted. Scrape away all the caked-on grass clippings and mud. A clean deck dramatically improves airflow, which enhances the cutting and bagging performance of your new OEM part.
Finally, consider keeping a spare replacement ready in your garage. Hitting an unexpected rock ruins your edge instantly. Having a backup allows you to perform a quick lawn mower blade replacement and finish your yard chores without interruption.
Take Action to Restore Your Mower
Do not let dull equipment ruin your beautiful lawn. Fixing this issue takes very little time and requires only basic hand tools.
Check the latest OEM replacement parts available for your specific model today. Grab your mower's model number, typically located on the rear deck, and search our database. Browse verified replacement components and get your yard looking perfectly manicured again.
Frequently Asked Questions
How often should I perform a lawn mower blade replacement?
Most homeowners should replace this component once a year, typically at the start of the spring mowing season. If you mow a very large property or frequently hit debris, you may need to replace it twice a season.
Are aftermarket parts just as good as OEM?
No. OEM parts use superior steel alloys and match the exact specifications of your mower. Aftermarket items often fail to balance correctly and wear out much faster than authentic components.
Does it matter which side faces down?
Yes, orientation is critical. The lifting wings on the ends must point up toward the mower deck. If installed upside down, the machine will not cut grass or bag clippings properly.
How tight should the mounting bolt be?
The bolt should be very tight to prevent slipping. If you own a torque wrench, consult your owner's manual for the exact torque specification. Generally, 45 to 55 foot-pounds provides a secure hold.
What if my mounting bolt is stuck?
Apply a generous amount of penetrating oil to the bolt threads and let it sit for twenty minutes. Use a long-handled socket wrench or a breaker bar to get extra leverage.
Can I trust online part catalogs for older mowers?
Absolutely. With access to a 2+ million parts inventory, locating items for discontinued or vintage machines is highly successful.
What happens if I order the wrong size?
You never have to worry about simple mistakes. Thanks to a comprehensive 365-day return policy, you can send back the incorrect item and easily exchange it for the proper fit.
Conclusion
Mastering a basic lawn mower blade replacement empowers you to maintain your equipment like a professional. You save money on repair shop fees and protect the health of your turf. Always prioritize safety by disconnecting the spark plug and wearing heavy gloves. By choosing genuine OEM parts, leveraging fast shipping from the USA, and following expert installation techniques, your mower will deliver a pristine cut season after season.
The Ultimate Buyer’s Guide to Racing and Flight Simulators
By Zayam AR
Published on 2025-12-11 17:33:00

By Trak Racer's build a pro-level racing or flight simulator with the right frame, controls, seat, and accessories. Upgrade smartly and enjoy immersive, realistic performance.
If you’re reading this, chances are you want more out of your virtual racing or flight experience. Maybe you’ve watched a pro streamer or visited a sim cafe. Perhaps you’re simply ready to replace the wobbly desk-and-wheel combo that’s been holding you back. Wherever you are on your journey, this guide aims to help you make smart choices, avoid common pitfalls, and build a setup that truly delivers, whether you’re gunning for a spot on the podium or enjoying takeoffs on a Sunday morning.
Below, we’ll break down each component that goes into premium racing simulators and flight simulators and help you decide what matters most for your needs, your space, and your ambitions.
Step 1: Why the Right Frame is Non-Negotiable
The real backbone of any simulator rig isn’t the wheel or stick; it’s the frame. Countless sim racers and virtual pilots have learned this the hard way: a flimsy base or simple wheel stand will eventually let you down. Sloppy flex, sliding pedals, or a seat that won’t stay put can turn an hour of fun into frustration.
What should you look for in a simulator frame?
-
- Build Quality: Choose a frame made from durable materials, like powder-coated steel or thick aluminum. These resist flex and stand up to heavy braking or the demands of a direct-drive wheel.
- Ergonomics and Adjustability: Your hours-long sessions deserve comfort. Well-designed rigs, like those from Trak Racer, let you adjust seat position, wheel height, and pedal angle so you can dial in a natural, authentic driving or flying posture.
- Platform Flexibility: A strong perk of investing in Trak Racer is broad compatibility. Their rigs support peripherals from all the major brands, such think Fanatec, Logitech, Thrustmaster, which means the frame grows with you, no matter how your gear evolves.
- Build Quality: Choose a frame made from durable materials, like powder-coated steel or thick aluminum. These resist flex and stand up to heavy braking or the demands of a direct-drive wheel.
Comparing options: If you’re just dipping your toes in, a wheel stand can suffice, but you’ll quickly notice the difference upgrading to a dedicated cockpit makes. Once you try a full rig, you’ll see why serious enthusiasts won’t go back.
Step 2: Controls That Connect You to the Action
The magic of simulation is in feeling like you’re actually the e taking a corner at Silverstone, or lining up a crosswind landing. That immersion depends on the physical controls you use.
For Racing Setups:
-
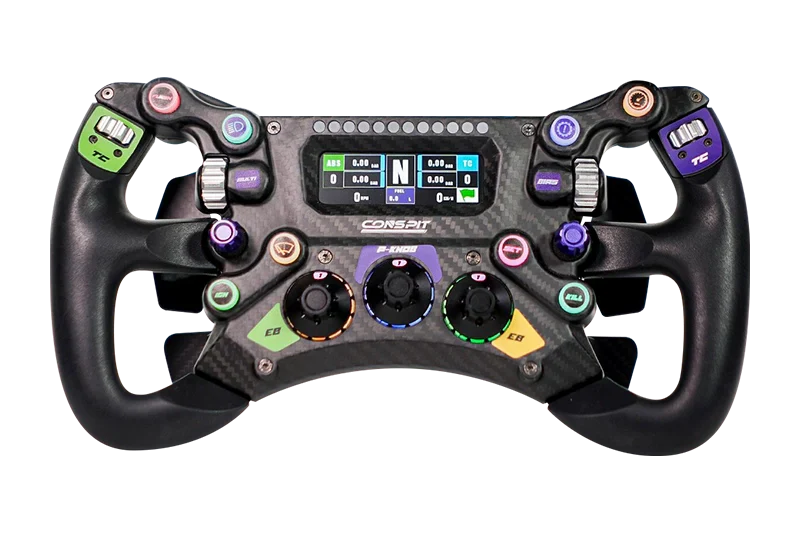
- Wheelbase: This unit provides forcfeedbacac,, helping you sense everything from curbs to tire grip. Direct-drive models offer phenomenal realism and power, but even quality belt-driven wheels can elevate your experience.
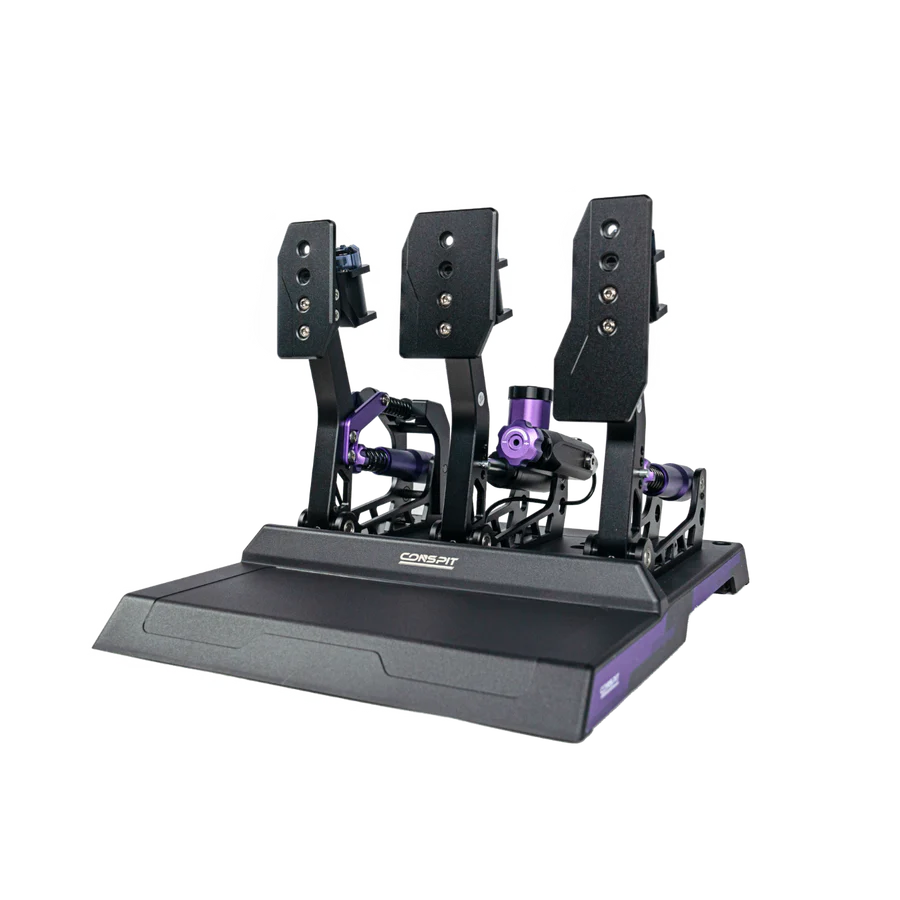
- Pedals: Seasoned sim racers quickly learn that consistent, progressive pedals matter just as much as, if not more than, the wheel. Look for pedals with load cells (they measure pressure, not just movement) for a car-like braking feel.
- Wheelbase: This unit provides forcfeedbacac,, helping you sense everything from curbs to tire grip. Direct-drive models offer phenomenal realism and power, but even quality belt-driven wheels can elevate your experience.
Buy Now
For Flight Simulators:
-
- Yoke or Joystick: Commercial pilots and GA flyers tend to prefer a yoke, while flight sim fans who fly military jets or aerobatic aircraft often opt for a joystick.
- Throttle Quadrant: Adds essential realism, letting you control engine power, flaps, and more with true-to-life precision.
- Rudder Pedals: These complete your cockpit, giving full axis control for taxiing, flight corrections, and smooth landings.
- Yoke or Joystick: Commercial pilots and GA flyers tend to prefer a yoke, while flight sim fans who fly military jets or aerobatic aircraft often opt for a joystick.
Buy Now
Pro tip: Match your “command center” to your favorite style of sim F1, GT, rally, airliner, or fighter jet. And if you love a bit of everything, modular rigs from Trak Racer let you swap and upgrade easily.
Step 3: Don’t Underestimate Your Seat
It’s not flashy, but your seat is what keeps you playing comfortably run after run. Hours can fly by when you’re comfortable, but aches make even the best sim less appealing.
-
- GT-Style Recliners: Perfect if you want the adjustability and feel of a road car, with comfort for longer stints.
- Fixed Bucket Seats: If maximum support and a true racing posture are your goal, a fixed-back bucket seat bolts you in just like a real track car, which can help you pick up subtle force feedback.
- Flight Seats: Upright, with cutouts for yokes or center sticks, these cater to pilots looking for long-haul comfort and realism.
- GT-Style Recliners: Perfect if you want the adjustability and feel of a road car, with comfort for longer stints.
Trak Racer’s seat lineup is engineered to work seamlessly with their rigs, no jury rigging or headaches about fit.
Step 4: Bring the Experience to Life with Screens and Accessories
The last mile, the difference between good and great, is all about your view and fine touches.
-
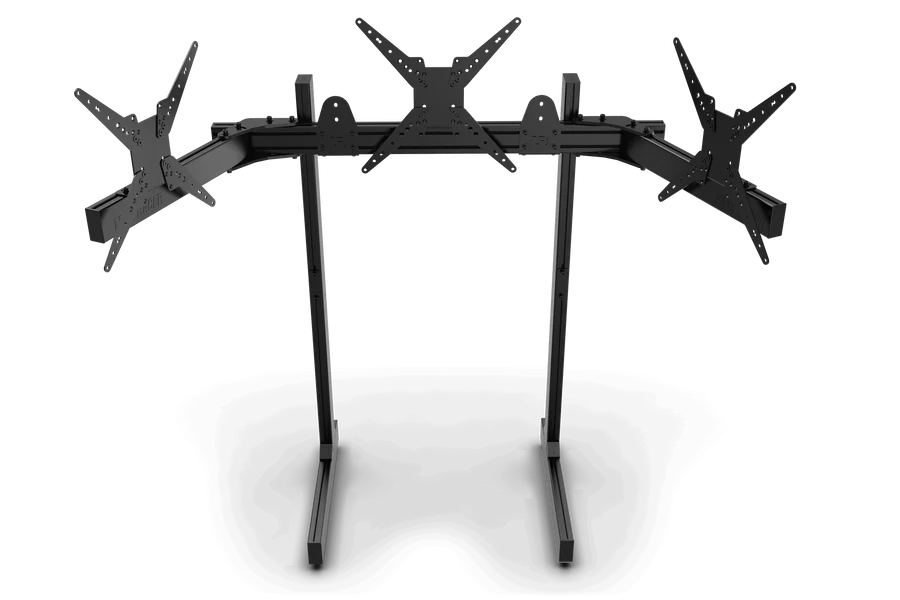
- Monitor Stands: Mounting your screen (or a triple-screen setup) directly to your rig keeps your field of view perfect and stable. No more shaky desks or awkward sightlines.
- Virtual Reality (VR): If you want the next level of immersion, a headset like the Pimax Crystal Light can put you smack in the middle of the cockpit, letting you glance at gauges or check your mirrors with instinctive movements.
- Add-ons That Make a Difference: Think keyboard trays, speaker mounts, or cup holders for those marathon race nights. These little upgrades go a long way in making your sim time enjoyable.
- Monitor Stands: Mounting your screen (or a triple-screen setup) directly to your rig keeps your field of view perfect and stable. No more shaky desks or awkward sightlines.
Buy Now
How to Build Your Dream Rig (and Stick to Budget)
Nobody says you need to buy everything on day one. Start with the rig and seat your foundation, then gradually add wheel, pedals, and accessories as your hobby (and skill) grows. With a platform like Trak Racer’s, your investment is protected and “future-proofed”.
If you’re uncertain where to begin or which products will fit your unique space or needs, Trak Racer’s team and community are a reliable resource, generously sharing build advice, upgrade ideas, and honest feedback.
Frequently Asked Questions (FAQ)
Is the frame really that important, or should I focus on the wheel?
Even the best wheel can’t overcome a flexible or unstable base. If you care about consistency and realism, upgrade your frame first.
Can I get away with a single monitor, or should I invest in triples or VR?
A single monitor works for most, but adding triple screens or trying VR dramatically improves immersion and situational awareness for both racers and pilots.
What’s the ideal footprint for a home simulator?
Set aside at least 2' x 5' for a typical rig, plus room to get in and out comfortably. Always compare specific product measurements.
Can one rig be used for both racing and flight simulation?
Many frames, including Trak Racer’s, are designed to be modular. You can add flight controls to a racing rig or vice versa.
Are load cell pedals really worth the extra investment for beginners?
If you take simulation seriously or want to build good habits from day one, yes. Load cell pedals offer a consistent, authentic brake feel, making you a better driver.
Ready to take the plunge? Explore Trak Racer’s range of frames, seats, and accessories to create a simulator that’s built for you, whether you’re flying sky high or chasing the racing line. For pro tips, honest reviews, or installation support, check the community page, product FAQs, or reach out to contact support. Quality simulation starts with a quality foundation, and Trak Racer is ready to help you drive, fly, and race at your very best.


Related
Why James Oro Frames Are the Ultimate Statement in Luxury Eyewear

The Science of Rest: How the Plufl Redefines Comfort and Sleep

5 Reasons Peter Stone Jewelry is the Perfect Gift for Any Occasion

The Ultimate Guide to Choosing and Caring for Wooden Maps